|
High Pressure Freeze and Freeze Substitution
by Hall, Hartwieg and Nguyen
doi:10.3908/wormatlas.9.4
1. Overview
2. Summary Protocols
3. Sample Preparation and Loading for HPF
4.
After Freezing
5.
Freeze Substitution
6.
Tissue Embedding
1. Overview
In the high pressure freeze (HPF) procedure, living animals are rapidly chilled to liquid nitrogen temperature while exposed simultaneously to very high pressures (2100 bar), forcing the animals to become frozen as vitreous ice while preventing the formation of any detectable ice crystals. This rapid freezing preserves the animals immediate posture and the true shape of all organelles. Indeed, most tissues look substantially different after HPF compared to any previous immersion or microwave fixation method. Cells, nuclei, and larger organelles appear more spherical or smoothly rounded, lacking sharp angles or corners. Cell appositions are smoother and often a bit different in their degree of separation compared to older techniques. This sometimes gives improved views of intercellular junctions, including gap junctions, and septate junctions. Novel fine details have become evident in chemical synapses, and evidence for exocytosis and endocytosis omega figures has become much more frequent than ever before (see SomaticFIG 2E). A few tissues look drastically different, especially the basal lamina (basement membrane), which now appears space-filling rather than forming thin layers (Bénard et al., 2006; Hall and Altun, 2008; see also Extracellular Matrix). EMHPFFIG 1 shows a few sample HPF images.
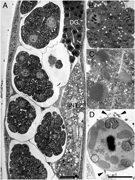 EMHPFFIG 1 EMHPFFIG 1
Following HPF, frozen samples are immersed in a fixative at very low temperatures for 17 days to undergo freeze substitution (FS). Here the intact frozen specimen very slowly melts into an organic fixative (such as osmium tetroxide in acetone), replacing melting water molecules with organic solvent while depositing heavy metal for contrast and fixing everything in place.
Protocols have been adapted to provide for either ultrastructure, or for immunoEM, or sometimes for both (Cueva et al., 2007; McDonald, 1994, 2009; Rostaing et al., 2004; Weimer, 2006; Stigloher et al., 2011). Radically faster FS protocols have been described by McDonald and Webb (2011). Pioneering work on the method for C. elegans ultrastructure was done by Colleen Lavin in the White lab at Wisconsin. Further improvements have been developed by Kent McDonald, Jean-Louis Bessereau, and their colleagues. We have especially benefited from discussions with Rick Fetter (Janelia Farms), Rob Weimer (Genentech), and Dan Bumbarger (MPI, Tubingen) who have continued to test new protocols and sample handling techniques for
C. elegans and other nematode species (cf. Bumbarger et al., 2006). At Einstein, HPF protocols and sample handling have been tested with technical help from Ken Nguyen, Leslie Gunther, Juan Jimenez, Geoff Perumal, Frank Macaluso, and from many visiting students. Protocols are now being compared and tested to improve the look of various organelles and cytoskeletal elements.
HPF and FS are also recommended for new computer-based 3D reconstruction techniques, such as electron tomography and FIB/SEM (a separate protocol is given in the FIB/SEM section). Given the more precise preservation of fine detail after HPF + FS, it now becomes fruitful to explore small features at higher resolution than had been practical before now.
2. Summary Protocols
A. HPF protocol for ultrastructure
- 2% osmium tetroxide in 98% acetone + 2% water. Hold at –90°C for 110 h, then warm slowly to –20°C (5°/h), hold at –20°C for 16 h, warm to 0°C slowly (6°/h), then hold at 0°C. (These holding times offer the chance to switch to a second fixative if desired.)
- Three rinses in 100% acetone, 20 min each, at 0°C (can be done in the FS device).
- Remove from specimen carrier at room temperature and rinse three times in 100% acetone, 20 min each, rt.
- Place samples into Microporous Specimen Capsule (cat #70187-21 from Electron Microscopy Sciences, Hatfield, PA) and submerge closed capsule in one part resin*, three parts acetone in a capped shell vial. Place on rotator at rt for 3 h.
- Change to 1:1 resin:acetone mixture, and rotate at rt for 3 h.
- Change to 3:1 resin:acetone mixture, and rotate at rt for 16 h.
- Change to 100% resin four times over next 24 h and rotate at rt.
- Embed between Aclar films or in embedding mold and cure at 60°C for 2 days.
*Resin Mixture: 24 g Embed812, 9 g DDSA, 15 g NMA, mix these components well, then add 0.75 g DMP-30 and mix well again. Store resin in desiccator at rt until ready for use. Add accelerator only in final few steps with 100% resin. Try not to add air bubbles while mixing the resin. Stir gently with a dry wooden applicator (tongue depressor) or with a stirring bar on a low setting. After thorough mixing, the resin should be de-gassed under vacuum in the desiccator, and then stored over desiccant thereafter to keep it dry.
*Resin Mixture for embryos: Start by mixing 30.76 g Embed 812, 22.19 g Araldite502, and 1.1 g DBP. Then take 9.44 g of this mixture, plus 15 g DDSA, 3.33 g NMA and 0.42 g DMP-30, and mix well again before use.
B. HPF protocol for immunoEM
- 0.2% glutaraldehyde in 98% acetone + 2% water. Hold at –90°C for 110 h, then warm slowly to –20°C (5°/h), hold at –20°C for 16 h, warm to 0°C slowly (6°/h), and then hold at 0°C.
- Four rinses in 100% acetone, 15 min each, at 0°C.
- Remove from specimen carrier at 0°C and place samples into Pella Microporous Specimen Capsule, and submerge closed capsule in one part Lowicryl HM20 resin**, two parts acetone in a capped shell vial. Hold at 4°C for 3 h.
- Change to 2:1 resin:acetone mixture and hold at 4°C for 10–20 h.
- Change to 100% Lowicryl HM20 resin five times over next 48 h and hold at –20°C.
- Transfer samples to gelatin capsules, fill with Lowicryl HM20 resin, seal capsule, and cure at –20°C under UV for 1–2 days. Minimize the amount of air inside the capsule to get the best cure.
C. Alternate HPF protocol for immunoEM
- 2% paraformaldehyde, 0.5% glutaraldehyde, 0.1% UAc in 98% methanol + 2% water. Hold at –90°C for 110 h, then warm slowly to –60°C (5°/h), hold at –30°C for 16 h, then hold at –30°C in the FS machine.
- Four rinses in 100% methanol, 20 min each at –30°C in FS machine.
- 1:1 methanol:acetone, 20 min at –30°C in FS machine.
- Two rinses in 100% acetone, 15 min each at –20°C.
- Remove tissue from specimen carrier at 4°C. Then place samples into Pella Microporous Specimen Capsule and submerge closed capsule in one part HM20 resin**, two parts acetone in a capped shell vial. Hold at 4°C for 3 h.
- Change to 2:1 resin:acetone mixture and hold at 4°C for 10–20 h.
- Change to 100% Lowicryl HM20 resin five times over next 48 h and hold at –20°C.
- Transfer samples to gelatin capsules, fill with Lowicryl HM20 resin, seal capsule, and cure at –20°C under UV for 1–2 days.
**Resin Mixture: Lowicryl HM20 can be purchased either with the accelerator as a separate component, or as a Mono-Step mixture with the accelerator already included. Either choice works well.
Troubleshooting
There are alternative fixatives that might be compared to Protocol A for ultrastructure. One might start with an aldehyde fix first, or perhaps tannic acid, followed by an osmium fix. However, we have found tannic acid very difficult to use on nematodes by HPF.
There are many alternative procedures possible for immunoEM after HPF. Different primary fixatives, solvents, dehydration components, and embedding resins have all been tested by the C. elegans community. The protocols summarized in B and C are two suggestions, but there are many possible variations on this theme (cf. McDonald, 1994, 2009; Weimer, 2006). Curing Lowicryl or LR Gold works best by minimizing exposure of the liquid resin to air. Samples are transferred in fresh resin into either sealed gelatin capsules,
or into clear thin wall microcentrifuge tubes (0.2 mL) that can be held in 96 well racks (Matrix pipette tip racks) for a UV cure in the Pelco Cryobox overnight (discussed in Microwave Assisted Fixation for Immunocytochemistry). If the Lowicryl is not completely cured after 18 h under UV (still too soft), add more dry ice to the Pelco Cryochamber (EMHPFFIG 4) and place back under UV for another day. If it remains too soft, one can try placing it into a 60°C oven overnight.
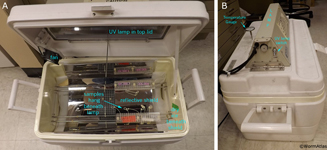 EMHPFFIG 4 EMHPFFIG 4
3. Sample Preparation and Loading for HPF
Description
While other model organisms often remain rather difficult to handle for HPF, the nematode seems uniquely well suited. It is simple to load 1030 living, intact animals at once into the HPF specimen carrier. If desired, one may load a single animal with a unique provenance or phenotype, although one can expect difficulties in recovering it in later steps of the procedure. For many experiments, we presort animals by exact age or phenotype into small groups to obtain reliable anatomical information about a very specific condition and time point. For instance, one can observe developing larvae by DIC or fluorescence, watching for a specific cell to be born or move into position, and grouping such animals during a brief interval (10 min) before mounting that group into the holder to freeze them all in a uniform state. Embryos can be treated in the same manner, synchronizing them by eye under a dissection scope, allowing them to develop to a precise stage, and then lumping them together in a pile of E. coli before transfer into the HPF specimen carrier. A more exacting method has been developed to collect light microscopic or fluorescence images of the specimens prior to sample loading for HPF that can be used to guide specimen positioning for thin sections and reconstruction (Kolotuev et al., 2009).
Several different mounting media have proven useful for nematode HPF. Special devices such as kidney dialysis tubing or thin copper tubing can be used to position many worms so that they are close together in a linear arrangement. However, the most common method involves loading the live worms in the presence of E. coli directly into the metal specimen carrier (hat) as a slurry, while trying to exactly fill the depth of the carrier with no voids or overfilling (EMHPFFIG 2), so that the metal pieces fit tightly together inside the HPF holder. Other media can replace E. coli as packing material. Rehydrated yeast can work, but both bacteria and yeast tend to stain very darkly and they may obscure the presence of nematodes inside the sample at later stages in processing. This is a special problem with isolated nematode embryos or early larvae. For these samples, it is more useful to use 20% BSA as the mounting medium, since it remains viscous, excludes air pockets, compresses well, and stays clear even after osmium staining. Sometimes, it is convenient to mix embryos, E. coli, and BSA inside the hat. The viscous E. coli help in transferring embryos as a group into the hat, after which 20% BSA is used to dilute the assemblage of bacteria enough to keep them from obscuring view of the embryos.
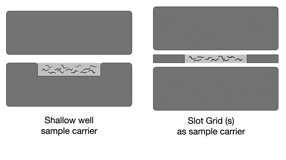 EMHPFFIG 2 EMHPFFIG 2
Transferring animals into the specimen carrier requires dexterity and speed so that the animals, yeast, E. coli, and/or BSA do not dry out. Worms or embryos are usually transferred with a platinum wire wormpick under a dissection microscope so that the animals are easily seen on the plate or in the hat. One should aim to load samples to the lower hat within 35 min or faster, as longer times lead to drying artifacts and poor preservation. If loading worms plus E. coli, it is simplest to place the bottom hat directly on the agar culture plate with the worms. Overhead illumination allows for the worms, bacteria, and the hat to be viewed simultaneously in the same focal plane. The worms and bacteria can be moved from one substrate to the other, without changing microscopes or shuffling samples. When the lower hat is full, quickly give the top hat a thin coating of 1-hexadecene, place the two hats firmly together (EMHPFFIG 2), and load this sandwich into the sample holder for HPF.
Drawbacks
We found that it is difficult to make animals straight prior to freezing, since they are typically still swimming or crawling in the mounting medium until the moment of freezing. Animals can be anaesthetized using 2, 3 butanedione, propylene phenoxitol, alcohol, or a cold temperature just before freezing. Any of these treatments may reduce body bends and straighten the animals. Ideally, one might wish to pre-position several worms in close proximity just prior to HPF, but this is also difficult (see Kolotuev et al., 2009 for one solution). Since the fixed worms are already in an organic solvent (i.e., not aqueous) after freeze substitution, it is impossible to move them back into an agar block for positioning. We have tried to slowly rehydrate the frozen, fixed worms to allow an agar step or aqueous staining, but this generally introduces new problems and artifacts, so we do not recommend it.
In some tissues where all intercellular appositions are quite close, the identification of gap junctions actually becomes more difficult by HPF than after immersion fixation. This is proving true for the pharynx in particular.
Helpful Hints
Early stage embryos are simpler to handle by preparing the mothers for HPF, then sectioning the ovary lengthwise to view multiple embryos in a row in
each thin section (EMHPFFIG 1). For technical reasons, the adult mothers are much simpler
to recover, embed, and thin section than small individual embryos. The mothers can
be treated to delay egg laying to allow more fertilized embryos to build up inside the
mother prior to HPF treatment.
Metal hats are usually coated inside with a small amount of 1-hexadecene
before filling with mounting medium or worms as this treatment facilitates release of the
sample after freezing and freeze substitution. Similarly, 1-hexadecene can also be
used to treat the lower surface of the top hat to permit free release of this metal hat
at the end of the freezing run. A micropipette is used to add a small amount of
1-hexadecene into the chamber of lower hat, after which a thin piece of filter paper
is used to remove the excess, leaving only a minimal coating.
Loading worms into dialysis tubing is actually rather simple, but holding the worms inside the tubing can be difficult. Worms will quickly flow directly into thin
empty tubing by osmotic pressure. Once filled, the tubing should be sealed by
pinching firmly with forceps on either side of grouped worms. The sealed tubing
is then cut with a sharp blade to fit exactly into a hat for HPF. Loading into tubing is
not irreversible. The tubing sometimes begins to leak solution and worms after the
final tube trimming, so check the seal and try loading fast.
The leading brands for HPF devices are Leica and Bal-Tec (BalTec HM 010,
BalTec HM 100, Leica HM 100, Leica EMPACT2); Leica is currently the principal vendor for all
three machines in the United States. The Wohlwend HPF Compact 01 (Technotrade,
Manchester, NH) is an alternate model. While these devices are expensive, they have
become more widely available in the past few years. Freeze substitution equipment
has been principally developed by Bal-Tec, Leica and RMC (EMHPFFIG 5). However, it is also
possible to conduct that portion of the protocol with low tech, inexpensive alternatives (cf. McDonald, 1994). A cheaper device is available from Leica in which pressure is generated by freezing worms inside a sealed copper tube (EM SPF Self-Pressurized Freezer).
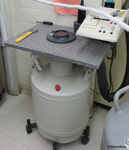 EMHPFFIG 5 EMHPFFIG 5
Troubleshooting
Freeze quality is related to the rapidity with which the animals
are cooled; thinner samples held between two metal hats will show fewer ice artifacts
than thicker samples held inside a deep hat. The depth of the chamber in a hat varies.
Type A hats have two sides, one with a shallow chamber and one with a deeper
chamber. Type B hats have a deep chamber on one side and the other side is flat.
Since adult worms fit well in the shallow side of the type A hat, we place worms into
that hat, with the flat side of a B hat as the lid (EMHPFFIG 2A).
The presence of ice artifacts is often most evident at cell nuclei, but may look
worse in one portion of an animal than another (EMHPFFIG 3). Ice damage suggests either
the presence of a void space inside the sample chamber during loading, or a failure of the hat to close well due to overfilling. By using one or two slot grids to create a narrow chamber between two blank hats, a
thinner tissue sample can be loaded which will freeze faster and give the ultimate in freeze quality (Rick
Fetter provided this concept). Less material in a narrow chamber allows maximum
heat transfer from the sample to the metal hat. Another custom device for holding
worms for HPF has been described by Bumbarger et al. (2006).
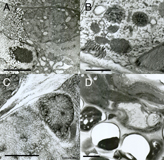 EMHPFFIG 3 EMHPFFIG 3
No matter which type of holder is used, the inside chamber should be filled
exactly, but not overfilled, so that the two hats seal effectively and contain no void
volume.
4. After Freezing
Description
Once a sample has been frozen, it is removed from the HPF unit and the (still
closed) frozen sample carrier is carefully transferred from the sample injector onto a
holding platform beneath a shallow pool of liquid nitrogen. Many samples may be
staged on this platform, grouping those that can undergo freeze substitution in one
vial of fixative. Thus, frozen samples may be held for minutes to hours on the
platform until the freeze substitution unit (FS device) is ready. Fixative solutions
are mixed fresh on the day of use, aliquoted into shell vials, and precooled to liquid
nitrogen temperature. Frozen hats are transferred into the frozen fixative and covered
with a bit more liquid nitrogen. Then the shell vial is transferred into the FS device and allowed to slowly warm to 90°C. The shell vials should not be capped at first,
since the fixative and samples might explode through the cap as they warm up.
Instead, wait at least 1 h for the vials and sample to equilibrate in the FS before
tightly sealing the cap.
Helpful Hints
Some fixatives are only partially soluble in organic solvents.
Therefore, to include them in the final mixture, they must first be dissolved in a
more compatible solvent (water, methanol), and then mixed into the final solution to
yield a mixture that includes a small percentage of the second solvent. In fact, several
labs have found that the best freeze substitution solutions should include a small
amount of water anyway, usually 25%. The sample carriers must stay cold, and in
order to move them without warming, one must always pre-chill the tips of the tongs
or forceps under liquid nitrogen before touching the samples.
Drawbacks
The worm samples are very fragile at the end of freeze substitution, and it can be tricky to remove tissues from the hat for plastic embedment without breaking the individual intact worms. There are also difficulties in viewing the fixed animals if they have been held inside E. coli or yeast paste due to the very dark appearance of the mounting medium (bacteria and yeast both stain with the osmium and are often darker than the worms).
5. Freeze Substitution
Description
Sample carriers are quickly transferred from the staging platform into pre-chilled shell vials containing the first fixative and placed into the FS device (see above). When all samples are ready, the FS device is programmed to begin the slow freeze substitution protocol, beginning at -90°C for one or more days before slowly warming up. If desired, a second, different fixation mixture can be introduced after several days to replace the first mixture. Thus one may decide to fix first with aldehydes, or tannic acid, and to later switch to osmium tetroxide as a second fixative in order to preserve and stain different components within the sample. This switch in fixative might occur at -90°C, or at some intermediate temperature, perhaps -30°C, or after the sample has warmed to 0°C. When fixation is complete, samples are generally rinsed several times in cold solvent (100% acetone) at 0°C before removing the sample carriers from the shell vial.
Helpful Hints
Before changing solutions, place the next fixative or solvent rinse into a new shell vial inside the FS device to let it equilibrate to the same temperature as your samples. The FS device may allow the user to program several different standard protocols. Thus, one might have one program for ultrastructure, another for immunoEM, and perhaps more programs for alternate types of specimens. When beginning such a long protocol inside the FS device, the user needs to be assured that the lab will have continuous electrical power over that time period, and that someone is assigned to add more liquid nitrogen periodically. A large supply of liquid nitrogen should be on hand from day one of the protocol. Loss of power can cause the FS device to forget the program, and a lack of liquid nitrogen can allow the FS device to warm up prematurely.
Troubleshooting
There are several things that can go wrong during freeze substitution. If the whole sample turns jet black, it becomes impossible the see the worms inside an E. coli pellet and after embedment. This condition may arise if the fixative vial inside the FS unit is not tightly sealed, allowing the osmium to oxidize. Samples may also become over fixed or oxidized if the fixative is not removed before the samples go above 4°C. We generally try to rinse samples in pure acetone when the FS unit has warmed to 0°C or 4°C. While it may be possible to collect sections blindly through a solid black sample in search of a well-fixed worm, we do not find this to be productive.
6. Tissue Embedding
Description
After rinsing sample carriers in acetone or another solvent at 0°C, carriers should open freely. The tissue is now gently scraped out of the carrier (hat) into 100% acetone using a Micro-graver (MT13) or Micro-scraper (MT 21) (both from EMS) trying not to break the tissue too much, since each animal is now very fragile. Once free, tissue samples are transferred into a Microporous Specimen Capsule, which can be closed and placed into a larger shell vial and filled with more solvent. This special capsule allows free transfer of solvents and plastic embedding resins without losing the fixed nematodes or embryos. Each solution change is carried out simply within the larger shell vial, while the specimen capsule stays closed. In order to facilitate solution changes, the larger shell vials are capped and placed on a slowly rotating platform, gently agitating samples at room temperature. When samples are well infiltrated with 100% resin plus accelerator, they can be placed into a dry embedding mold, or can be flat embedded between two sheets of Aclar film, and then placed into a 60°C oven for 23 days to heat cure. When flat embedded, cured samples can be inspected under a light microscope to choose favored items, then cut out and re-embedded at the desired angle in a new embedding mold with fresh resin.
Helpful Hints
Another route to embedding is to keep the specimen in the specimen carrier until the sample has been infiltrated with resin. Then use a Micro-needle (MT01 or MT25; from EMS) or an insect pin (Austerlitz size 7 or size 00) to gently pry the sample from the carrier. This may cause less breakage of the animals.
Troubleshooting
When one collects enough serial thin sections, virtually all well-frozen samples still show microscopic defects somewhere, often appearing as apparent breaks in the cuticle or eggshell. It is unclear if these local defects are important to the quality of the fix, freeze substitution, or infiltration. As with other TEM methods, sample quality can vary widely. But if several samples in a row from one HPF run show poor freezing, all samples from that run are probably not good, and it is time to try again.
Figures
 Click pictures for new window with figure and legend, click again for high resolution image Click pictures for new window with figure and legend, click again for high resolution image
EMHPFFIG 1: HPF/FS fixation for the ultrastructure.
A. Low power lengthwise adult hermaphrodite midbody. DG, distal gonad, INT, intestine. A row of early embryos lie within the uterus (left side). Scalebar, 10 µm. B&C. Closeups of early embryos that were well-fixed while inside the intact mother. D. Spermatocyte is well-fixed inside the mother. Filopodia (arrowheads) emerge from the cell surface, which are never preserved without HPF. Scale bar, 1µm.
EMHPFFIG 2: HPF sample carriers.
A. Worms in mounting medium are placed into the shallow well in a Type A specimen carrier (below). The flat side of the Type B hat is used as the top. The two hats are squeezed together and loaded into the HPF sample loading system. No voids are desired inside the well, and no excess material is desired above the rim of the well. B. A more shallow well can be created by placing one or two slot grids between the flat sides of two Type B hats. Worms and mounting medium fill only the narrow slot, and should freeze faster.
EMHPFFIG 3: Freeze artifacts in HPF/FS. A. Nematode frozen by metal mirror fixation, where left side of the worm shows severe distortion due to poor freezing, while pharyngeal tissues on the right are better preserved. Scale bar, 2 µm. B. High-power section through the hypodermis. Extreme distortion of most organelles (dark objects) was caused by extensive ice crystal formation. Cytoplasm is virtually white in color due to ice. Scale bar, 1 µm. C. Higher power image showing starry-like dark fingers radiating outward from many objects. The dark fingers are distorted protein and lipid isolated by intervening fingers of (clear) ice crystals. Such defects are accentuated over a nucleus (right side of panel). Ice damage after HPF often looks like more subtle versions of the defects seen in B and C. Scale bar, 1 µm. D. Low-power image showing nematode (above) embedded lengthwise in yeast paste (below), where individual yeast cells have failed to freeze or embed well, leaving either an empty hole or a shriveled wisp filling one side of the hole, thus weakening the plastic section. The worm also looks distorted. Similar clear holes may form at worm embryos inside the mother if resin infiltration fails. Scale bar, 2 µm.
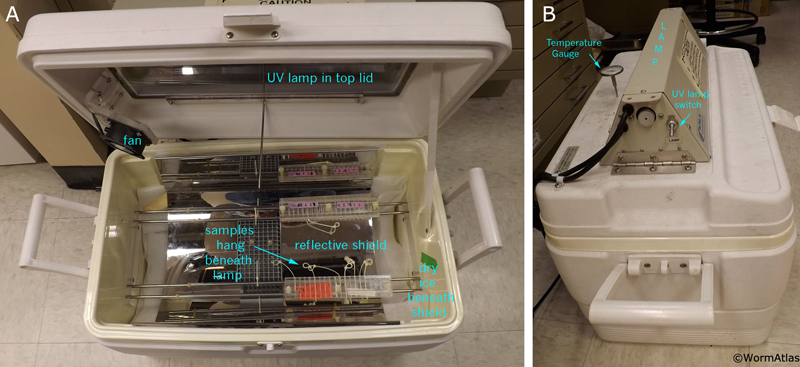
EMHPFFIG 5: RMC freeze substitution device. RMC freeze substitution device (available from Boeckeler Instruments, Tucson, AZ) is programmable, allowing for long term temperature control while HPF samples are exposed to fixatives, solvents or resin embedding steps.
References
Bénard, C Y., Boyanov, A., Hall, D.H. and Hobert, O. 2006. DIG-1, a novel giant protein, non-autonomously mediates maintenance of the nervous system architecture. Development 133: 33293340. Article
Bumbarger, D.J., Crum, J., Ellisman, M.H. and Baldwin, J.G. 2006. Three-dimensional reconstruction of the nose epidermal cells in the microbial feeding nematode, Acrobeles complexus (Nematoda: Rhabditida). J. Morphol. 267: 12571272. Abstract
Cueva, J.G., Mulholland, A. and Goodman, M.B. 2007. Nanoscale organization of the MEC-4 DEG/ ENaC sensory mechanotransduction channel in C. elegans touch receptor neurons. J. Neurosci. 27: 1408914098. Article
Hall, D.H. and Altun, Z. 2008. C. elegans Atlas. Cold Spring Harbor Laboratory Press, New York, p.
340. Abstract
Hall, D.H., Hartweig, E. and Nguyen, K.C.Q. 2012. Modern electron microscopy methods for C. elegans. Methods Cell Biol. 107: 93-149. Abstract
Kolotuev, I., Schwab, Y. and Labouesse, M. 2009. A precise and rapid mapping protocol for correlative light and electron microscopy of small invertebrate organisms. Biol. Cell 102: 121132. Abstract
McDonald, K.L. 1994. Electron microscopy and EM immunocytochemistry. Meth. Cell Biol. 44: 411444. Abstract
McDonald, K.L. 2009. A review of high-pressure freezing preparation techniques for correlative light and electron microscopy of the same cells and tissues. J. Microsc. 235: 273281. Abstract
McDonald, K.L. and R.I. Webb. 2011. Freeze substituion in 3 hours or less. J. Microsc. 243: 227-33. Article
Rostaing, P., Weimer, R.L., Jorgensen, E.M., Triller, A. and Bessereau, J.L. 2004. Preservation of immunoreactivity and fine structure of adult C. elegans tissues using high-pressure freezing. J. Histochem. Cytochem. 52: 112. Article
Stigloher C., Zhan, H., Zhen, M., Richmond, J. and Bessereau, J.L. 2011. The presynaptic dense projection of the Caenorhabiditis elegans cholinergic neuromuscular junction localizes synaptic vesicles at the active zone through SYD-2/Liprin and UNC-10/RIM-dependent interactions. J. Neurosci. 31:4388-96. Article
Weimer, R. M. 2006. Preservation of C. elegans tissue via high pressure freezing and freeze-substitution for ultrastructural analysis and immunocytochemistry. Meth. Mol. Biol. 351: 203221. Abstract
|
